The sound of a continuous trickle of water in the bathroom can be a nightmare for any homeowner or tenant mindful of their budget. As spring arrives, a season often associated with home renovations, it’s tempting to call in a professional at the first sign of trouble. However, a toilet tank that fills continuously rarely necessitates the installation of new equipment. This annoying issue, which can waste dozens of gallons of potable water each day, usually stems from a remarkably simple mechanical problem. Fortunately, the solution lies in a little-known technique that can be executed in record time.
Why your toilet is constantly running: unraveling the mystery behind the mechanism
The foolproof test to identify the leak’s exact source without dismantling anything
Before rushing to grab your tools, it’s crucial to make an accurate diagnosis. Water leaks quietly, often leaving only a faint trace on the porcelain of the bowl. To confirm a leak, simply add a few drops of food coloring into the tank. Without flushing, wait a moment. If you see color in the bowl, the verdict is clear: the seal is compromised. This phenomenon typically results from an internal imbalance or wear and tear on components located at the bottom of the toilet assembly.
Prepare your work area safely before the countdown begins
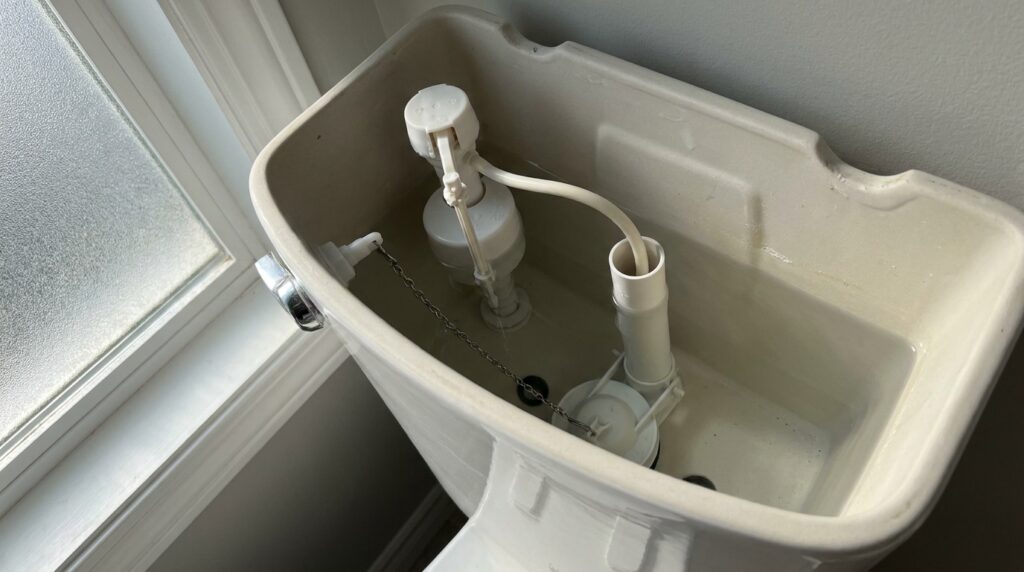
Working on a private plumbing system requires discipline. The first step is to turn off the water supply. The shut-off valve is usually located right next to the tank, on the copper or PEX line. Turn it firmly clockwise. Next, flush the toilet to empty any standing water. Carefully remove the lid by unscrewing the button mechanism if necessary. The inner workings are now exposed, ready for the emergency intervention that will save your installation.
The quick fix to rescue your toilet in three minutes
The thorough cleaning of the valve seat to remove hidden limescale
The secret to a speedy repair lies in a very specific targeted action: the cleaning of the valve seat. This is the large opening at the bottom through which water flows into the bowl. Over time, a film of limescale or debris can build up, preventing a proper seal. Grab a slightly abrasive sponge or a cloth soaked in white vinegar. Vigorously scrub the inner and outer edges of this opening. With just a few strokes, the surface will regain its smooth finish, ensuring a solid seat to block the water flow.
The essential trick to revive or replace the flapper seal cost-effectively
Once the base is spotless, turn your attention to the flapper seal, the large rubber washer that seals the opening. If it has become stiff due to limescale, vigorous rubbing with vinegar will restore its flexibility. However, if it appears swollen, loose, or cracked, replacement is key. Simply detach it from its central axis and slide on a new piece. You can find this item for just a few dollars at any hardware store. Replacing this flapper seal after thoroughly cleaning the valve seat will quickly eliminate the leak.
The magical float adjustment that cuts off the water supply for good
Adjust the calibration screw to achieve the perfect water level in the tank
The second scenario for running water involves overflow. If water is seeping from the large central tube, it means the level is rising too high before the shut-off valve closes. The system is poorly calibrated. The float, which signals when to stop, needs readjustment. Locate the long plastic screw attached to the float mechanism. Tighten it to force the float to stop the water supply lower. Adjusting the float is the third crucial step to maintaining the water level within the designated limits.
The repriming test to validate the absolute silence of your plumbing
With the tactile adjustments complete, it’s time for the ultimate test. Slowly reopen the side valve and allow the water to rise. Watch the float ascend and listen for the decisive click indicating the flow has stopped. The water level should now stabilize about two centimeters below the top edge of the safety tube. Carefully observe the bottom of the bowl: it should be calm, without any ripples. The mechanism has now returned to its original function.
Your quick rescue summary: a clean system and lower bills
Key takeaways: from cleaning the seal seat to float calibration
In summary, resolving a continuous water loss involves a series of remarkably effective checks. The strategic replacement of the flapper seal, combined with a thorough cleaning of the valve seat, ensures a solid seal below. Meanwhile, adjusting the float manages overflows. These quick and economical actions extend the lifespan of your plumbing system. Mastering these small tasks preserves the overall value of a property by preventing emerging issues.
Best maintenance practices to never hear water flowing again
Water is inherently an element that requires monitoring, especially in hard water areas. A monthly pour of household vinegar into the tank helps minimize harmful limescale buildup. Additionally, avoid forcing the toilet flush handle. Thoughtful and informed management of your household equipment guarantees tangible savings for residents, keeping the specter of high bills at bay.
By implementing this combination of minor mechanical tasks, peace of mind returns as swiftly as the financial drain is halted. Protecting your plumbing system ultimately boils down to pure logic and a bit of careful observation. When the next silent alarm sounds in your plumbing network, will you dare to dive in and resolve the issue yourself in just a matter of seconds?